Cloud SQL 만들기
컨텐츠 정보
- 4,192 조회
- 0 추천
-
목록
본문
# ✅ Check project permissions
## role 확인
☰ > AM & Admin > IAM > Navigation menu > Home
Compute Engine default service account
`{project-number}[email protected]`에 `edit` 권한이 있는지 확인
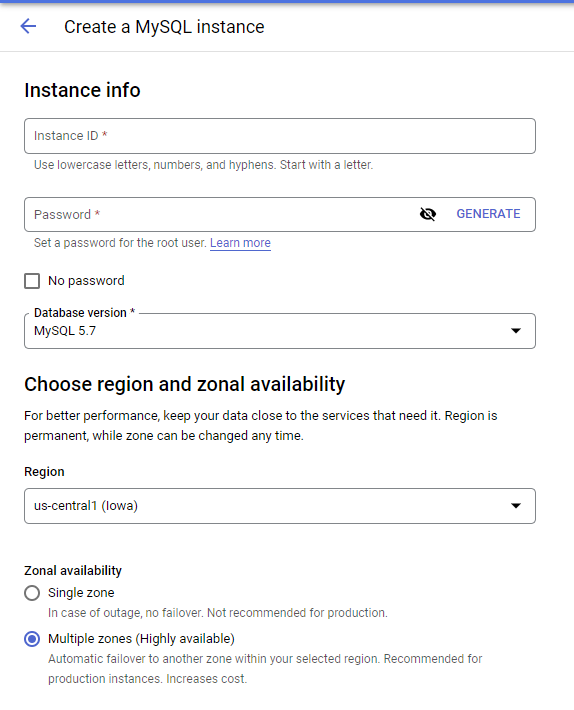
# Task 1. Create a Cloud SQL instance
☰ > SQL > Create instance > Choose MySQL
[Create]
# Task 2. Create tables
> 만드는데 시간이 좀 걸립니다.
> 퀵렙에서 SQL을 보고 퀴즈를 푸는 배려를 제공 합니다.
## Connect to the database
Connect to this instance > Open Cloud Shell
클라우드 콘솔 접속
접속
$`gcloud sql connect rentals --user=root --quiet`
비밀번호를 입력하면 접속이 되면 커서가 바뀝니다.
```
Welcome to the MySQL monitor. Commands end with ; or \g.
Your MySQL connection id is 40
Server version: 5.7.36-google-log (Google)
Copyright (c) 2000, 2022, Oracle and/or its affiliates.
Oracle is a registered trademark of Oracle Corporation and/or its
affiliates. Other names may be trademarks of their respective
owners.
Type 'help;' or '\h' for help. Type '\c' to clear the current input statement.
mysql>
```
`MySQL > SHOW DATABASES;`
```
> SHOW DATABASES;
(Output)
mysql> SHOW DATABASES;
+--------------------+
| Database |
+--------------------+
| information_schema |
| mysql |
| performance_schema |
| sys |
+--------------------+
4 rows in set (0.17 sec)
```
테이블을 생성하는 SQL을 복사해서 붙여 넣습니다.
```
CREATE DATABASE IF NOT EXISTS recommendation_spark;
USE recommendation_spark;
DROP TABLE IF EXISTS Recommendation;
DROP TABLE IF EXISTS Rating;
DROP TABLE IF EXISTS Accommodation;
CREATE TABLE IF NOT EXISTS Accommodation
(
id varchar(255),
title varchar(255),
location varchar(255),
price int,
rooms int,
rating float,
type varchar(255),
PRIMARY KEY (ID)
);
CREATE TABLE IF NOT EXISTS Rating
(
userId varchar(255),
accoId varchar(255),
rating int,
PRIMARY KEY(accoId, userId),
FOREIGN KEY (accoId)
REFERENCES Accommodation(id)
);
CREATE TABLE IF NOT EXISTS Recommendation
(
userId varchar(255),
accoId varchar(255),
prediction float,
PRIMARY KEY(userId, accoId),
FOREIGN KEY (accoId)
REFERENCES Accommodation(id)
);
SHOW DATABASES;
```
잘 생성 되었습니다.
```
mysql> SHOW DATABASES;
+----------------------+
| Database |
+----------------------+
| information_schema |
| mysql |
| performance_schema |
| recommendation_spark |
| sys |
+----------------------+
5 rows in set (0.17 sec)
```
USE recommendation_spark;
SHOW TABLES;
```
mysql> SHOW TABLES;
+--------------------------------+
| Tables_in_recommendation_spark |
+--------------------------------+
| Accommodation |
| Rating |
| Recommendation |
+--------------------------------+
3 rows in set (0.17 sec)
```
# Task 3. Stage data in Cloud Storage
새창을 열고 아래의 내용을 붙여 넣습니다.
```
echo "Creating bucket: gs://$DEVSHELL_PROJECT_ID"
gsutil mb gs://$DEVSHELL_PROJECT_ID
echo "Copying data to our storage from public dataset"
gsutil cp gs://cloud-training/bdml/v2.0/data/accommodation.csv gs://$DEVSHELL_PROJECT_ID
gsutil cp gs://cloud-training/bdml/v2.0/data/rating.csv gs://$DEVSHELL_PROJECT_ID
echo "Show the files in our bucket"
gsutil ls gs://$DEVSHELL_PROJECT_ID
echo "View some sample data"
gsutil cat gs://$DEVSHELL_PROJECT_ID/accommodation.csv
```
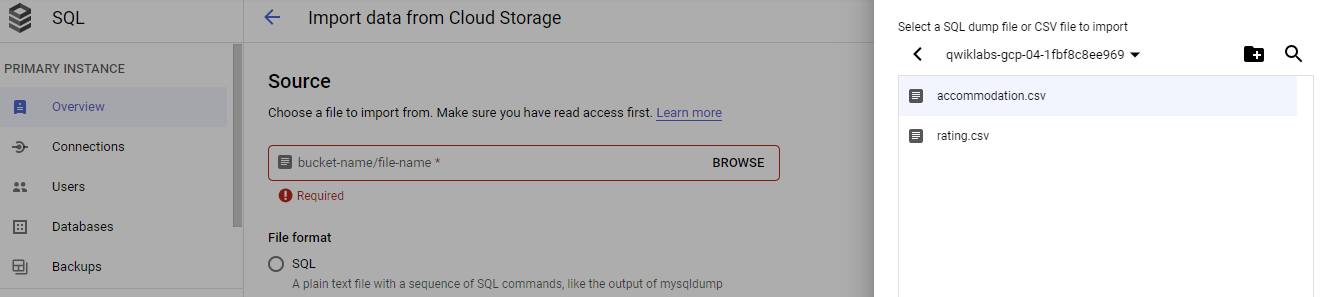
# Task 4. Load data from Cloud Storage into Cloud SQL tables
생성한 `rental` 에 접속 한 뒤 아래의 파일 2개를 import 합니다.
* accommodation.csv
* rating.csv
Browse > [Your-Bucket-Name] > accommodation.csv
# Task 5. Explore Cloud SQL data
쿼리를 해보는 단계입니다.
예시된 쿼리를 복사 붙여넣기 하면서 실습 할 수 있고,
결과를 보고 퀴즈를 푸는 단계입니다.
# Task 6. Launch Dataproc
## Munu
☰ > Dataproc
## create
[Create cluster]
* Set up Cluster : 이름, 존 설정
* Configure nodes: 머신 설정 (Master Node, Worker Node)
으로 설정하고 생성[Create] 합니다.
## Shell 에서 아래의 명령어를 입력합니다.
```
echo "Authorizing Cloud Dataproc to connect with Cloud SQL"
CLUSTER=rentals
CLOUDSQL=rentals
ZONE=us-central1-c
NWORKERS=2
machines="$CLUSTER-m"
for w in `seq 0 $(($NWORKERS - 1))`; do
machines="$machines $CLUSTER-w-$w"
done
echo "Machines to authorize: $machines in $ZONE ... finding their IP addresses"
ips=""
for machine in $machines; do
IP_ADDRESS=$(gcloud compute instances describe $machine --zone=$ZONE --format='value(networkInterfaces.accessConfigs[].natIP)' | sed "s/\['//g" | sed "s/'\]//g" )/32
echo "IP address of $machine is $IP_ADDRESS"
if [ -z $ips ]; then
ips=$IP_ADDRESS
else
ips="$ips,$IP_ADDRESS"
fi
done
echo "Authorizing [$ips] to access cloudsql=$CLOUDSQL"
gcloud sql instances patch $CLOUDSQL --authorized-networks $ips
```
prompte 에서 `Y`를 입력 한 뒤 `ENTER`를 누릅니다.
## ☰ > SQL > Overview 에서
ip를 확인합니다.
# Task 7. Run the ML model
```
gsutil cp gs://cloud-training/bdml/v2.0/model/train_and_apply.py train_and_apply.py
cloudshell edit train_and_apply.py
```
`train_and_apply.py` 에서
```
# MAKE EDITS HERE
CLOUDSQL_INSTANCE_IP = '' # <---- CHANGE (database server IP)
CLOUDSQL_DB_NAME = 'recommendation_spark' # <--- leave as-is
CLOUDSQL_USER = 'root' # <--- leave as-is
CLOUDSQL_PWD = '' # <---- CHANGE
```
`CLOUDSQL_INSTANCE_IP` 와 `CLOUDSQL_PWD`를 수정합니다.
그리고 Cloud Shell에서 이 파일을 Cloud Storage 버킷에 복사합니다.
`gsutil cp train_and_apply.py gs://$DEVSHELL_PROJECT_ID`
# Task 8. Run your ML job on Dataproc
## 메뉴
Dataproc > rentals > Submit job 에서
* `Job type` : PySpark
* `Main python file`: gs://{bucket-name}/train_and_apply.py/
* `Max restarts per hour`: 1 입력
[Submit] 합니다.
# Task 9. Explore inserted rows with SQL
새로운 브라우져 텝에서
## 메뉴
SQL > rentals > Connect to this instance > Open cloud shell 로 새로운 shell tab을 누릅니다.
실습을 진행 합니다.
```
SELECT
r.userid,
r.accoid,
r.prediction,
a.title,
a.location,
a.price,
a.rooms,
a.rating,
a.type
FROM Recommendation as r
JOIN Accommodation as a
ON r.accoid = a.id
WHERE r.userid = 10;
```
관련자료
댓글 0
등록된 댓글이 없습니다.


